Up: C1 Outfitting
Outfitting a C1 Creeker
As always, there are a thousand different ways to outfit a C1.
I did this outfitting for a Necky Blunt and a Dagger Nomad 8.5. Just because
this works great for me, does not mean it works for everyone. However, I find
the outfitting simple, reliable (does not break), and cheap. Comfy? Well, with
a 4.5 inch saddle, nothing is comfy, really.
When outfitting creekboats, I found one thing: I cannot glue to the plastic
and anything that is attached to a stiff outfitting base. This is because
the hull of the boat has to take a huge amount of stress when creeking.
Creeking often involves landing big boofs, going down rock slides, bouncing off
of rocks in steep boulder gardens, seal launching...
When doing all this, the Hull flexes and bends in all directions. That causes
foam to rip when it is attached to the hull and to, e.g. the foam pillars
at the same time. Thats why my outfitting has essentially two parts.
Part one: The Backbone
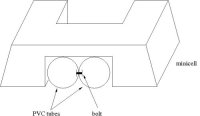
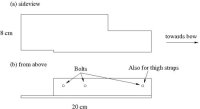
I always use some sort of backbone that I attach the thighstraps, kneewedges
and saddle to. For this backbone, I use 2 1.5 inch PVC pipes that reach
10-20cm underneath each foam pillar. In the Dagger boats, there is a plastic piece
in front of the foam pillar and I attach the PVC tubes to this plastic pillar.
The PVC tubes are hold together by 3 or 4 bolts, so they give a 3 inch wide
backbone. One Bold is also being used to attach a loop of nylon webbing as a thigh
strap anchor. It can be useful to attach webbing loops to the other bolts as well
that can then be used as handy attachment points in the stern and bow.
Once the tubes are bolted together, I glue foam to the bottom side that
resembles the shape of the hull. If the boat has a lot of rocker (e.g. Blunt),
it can be neccesary to use a heat gun to bend the tubes a little bit. The foam
also prevents the Hull from wearing to fast due to something very hard on the
inside.
 With the foam attached, I bolt the whole thing to the plastic pillar and again
use the bolts to put in webbing loops as attachment points for gear. Next, I
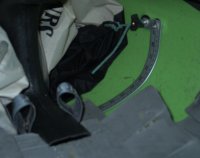
bend a thin aluminum stripe (e.g. one of those aluminum rulers from the
hardwarestore) to the shape of the crosssection of the boat (like a U) and bolt
it to the plastic pillar. Later this aluminum will be attached to the kayak
footrest mounts and it'll prevent sideways sliding of the backbone. I cover the
bolt with foam so it does not rest against the hull.
With the foam attached, I bolt the whole thing to the plastic pillar and again
use the bolts to put in webbing loops as attachment points for gear. Next, I
bend a thin aluminum stripe (e.g. one of those aluminum rulers from the
hardwarestore) to the shape of the crosssection of the boat (like a U) and bolt
it to the plastic pillar. Later this aluminum will be attached to the kayak
footrest mounts and it'll prevent sideways sliding of the backbone. I cover the
bolt with foam so it does not rest against the hull.
This whole combo is now installed into the boat. It is wedged underneath the
foam pillar in the stern and the aluminum is attached to the footrest mounts.
Note: the aluminum is not resting against the hull but a few mm away since the
foot rest mounts are sitting a few mm away from the hull. In the Nomad, the
plastic bulkhead is also attached to the hull with a bolt.
Now with the strongback installed, I attach saddle and knee wedges to the
backbone. For a saddle I use a 6 inch wide foam block that is cut out
(U-shape) in the centre, so it slides over the PVC tubes and I glue it to the
tubes. I try to keep the back rest of the saddle low. This is important in case
you get forced on your back deck on bigger drops. It prevents back injury. The
saddle is also slightly higher in the back to force me into a slightly forward
position which I find advantageous for creeking. Between my legs, the saddle
has a hump that keeps my bum from shifting forward. Some people like wider seats.
For me, the wider seat makes getting out of the boat harder and I thus avoid
wide seats. However, wide seats are more comfortable.
 The knee wedges are similar to the saddle. They are a block of foam with a
U-shaped gap in the middle, so they slide over the backbone and can be glued
to it. The wedges spread the knees apart while the knees rest on the knee pads
(see below).
The knee wedges are similar to the saddle. They are a block of foam with a
U-shaped gap in the middle, so they slide over the backbone and can be glued
to it. The wedges spread the knees apart while the knees rest on the knee pads
(see below).
Part two:
The second part of the outfitting is attached directly to the hull, so it can
flex with the hull. In my boat it's only the knee pads that I glue to the
hull. The knee pads are just thin sheets of foam (a few mm thick) that go from
underneath the knee wedges to where the knees rest against the sides of the
hull. Like this, i have my knees as far apart as possible.
Sometimes when I hit rocks really hard, I think about putting this kind of
padding below my ankles, too. Have not done that yet though.
Aux:
For thigh straps, I use standard Northwater padded straps. I get rid of the
webbing on one side, burn a hole for a bolt into the strap and attach
it to the cockpit rim. The side where the webbing remains is attached to
the loop that is on the back bone. Often the holes where the kayak
thigh braces attached to work great for thigh straps, so no new holes are
needed.
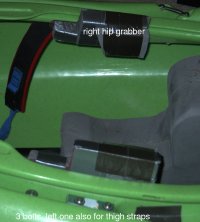 For hip grabbers or hip pads or whatever you want to call them, I use
kayak plastic. Kayak plastic is by far the best of the things I tried so far.
Just take an old kayak, and cut whatever plastic you need (thanks Shayne!!).
Then heat it up and bend it.
A few things to consider:
Don't make them too high, otherwise they interfer with the skirt and
stacking/69ing boats sucks. Its more important to have wide hip grabbers.
That means, they also keep your thighs in place. Use more than one attachment
point, otherwise you will crack the hull plastic. I use three bolts and between two
of them I use a steel sheet on the outside to distribute the stress over as much
hull area as possible. The third bolt is also used to attach the thigh straps.
The pads begin a little forward from where the back rest is to where the thigh
straps attach to the cockpit.
For hip grabbers or hip pads or whatever you want to call them, I use
kayak plastic. Kayak plastic is by far the best of the things I tried so far.
Just take an old kayak, and cut whatever plastic you need (thanks Shayne!!).
Then heat it up and bend it.
A few things to consider:
Don't make them too high, otherwise they interfer with the skirt and
stacking/69ing boats sucks. Its more important to have wide hip grabbers.
That means, they also keep your thighs in place. Use more than one attachment
point, otherwise you will crack the hull plastic. I use three bolts and between two
of them I use a steel sheet on the outside to distribute the stress over as much
hull area as possible. The third bolt is also used to attach the thigh straps.
The pads begin a little forward from where the back rest is to where the thigh
straps attach to the cockpit.
You can also laminate hip grabbers from glas but that is a lot more work. Some
people use aluminum but that's hard to get in the right size.
Don't compromise the width. With enough width, you get better control over the
boat. Add foam to your new hip grabbers until you have a snug fit.
I glue foam to the plastic with contact cement and then use a heat gun and
duct tape in addition to that.
I found that I need more foam than expected once everything is wet and I run
a river it the boat. However, always try to wet exit your boat before you go
paddling. It might save your live.
 This outfitting is much lighter than the original kayak outfitting. I mean, it
is a noticeable difference when you lift the boat. I could not believe how
heavy the Blunts' and the Nomads' kayak outfittings were.
This outfitting is much lighter than the original kayak outfitting. I mean, it
is a noticeable difference when you lift the boat. I could not believe how
heavy the Blunts' and the Nomads' kayak outfittings were.
For creek boats, I found it very useful to include a few attachment points in
the outfitting. I try to put little nylon webbing loops wherever I bolt
something to the back bone. These can then be used to attach float bags,
peli boxes, first aid kit, spare paddle and so on. Keep the weight of the outfitting
in mind. I found that weight does matter when running drops.
However, one does need a fair amount of stuff when going on harder rivers and
creeks. For most fairly remote runs here in BC, I take a lot of stuff: Spare paddle,
throw rope, rescue rope, pin kit, first aid, headlamp, couple spare energy
bars, emergency blankets. Thats why I try to keep the amount of foam and space needed for
outfitting to a minimum. This also gives you more room and easier access to
gear on multiday trips.
Sometimes I am thinking of some foam to prevent the knees from sliding into
the bow in a hard piton but could not come up with a smart solution.
I hope this helps someone. See ya creeking, Jan
Up: C1 Outfitting